Showing posts with label make. Show all posts
Showing posts with label make. Show all posts
Wednesday, March 18, 2015
How to Make a Rabbit Trap
A good serviceable rabbit trap can be made by sinking a common dry goods box in the ground to within 6 in. of its top. A hole 6 or 7 in. square is cut in each end level with the earths surface and boxes 18 in. long that will just fit are set in, hung on pivots, with the longest end outside, so they will lie horizontal. A rabbit may now look through the two tubes, says the American Thresherman.

Rabbit in the Trap
The bait is hung on a string from the top of the large box so that it may be seen and smelled from the outside. The rabbit naturally goes into the holes and in this trap there is nothing to awaken his suspicion.
He smells the bait, squeezes along past the center of the tube, when it tilts down and the game is shot into the pit, the tube righting itself at once for another catch.
The top and sides of the large box may be covered with leaves, snow or anything to hide it. A door placed in the top will enable the trapper to take out the animals.
By placing a little hay or other food in the bottom of the box the trap need not be visited oftener than once a week.
Excerpt from the book:
THE BOY MECHANIC
VOLUME I
700 THINGS FOR BOYS TO DO
WITH 800 ILLUSTRATIONS
1913, BY H. H. WINDSOR CHICAGO
POPULAR MECHANICS CO. PUBLISHERS
Read more »
Rabbit in the Trap
The bait is hung on a string from the top of the large box so that it may be seen and smelled from the outside. The rabbit naturally goes into the holes and in this trap there is nothing to awaken his suspicion.
He smells the bait, squeezes along past the center of the tube, when it tilts down and the game is shot into the pit, the tube righting itself at once for another catch.
The top and sides of the large box may be covered with leaves, snow or anything to hide it. A door placed in the top will enable the trapper to take out the animals.
By placing a little hay or other food in the bottom of the box the trap need not be visited oftener than once a week.
Excerpt from the book:
THE BOY MECHANIC
VOLUME I
700 THINGS FOR BOYS TO DO
WITH 800 ILLUSTRATIONS
1913, BY H. H. WINDSOR CHICAGO
POPULAR MECHANICS CO. PUBLISHERS

How to Make a Pinwheel – Art Projects For Kids
On a square sheet of paper cut from the corners four straight-line incisions. Fold toward the middle every second end, and pierce all four tops with needle trough the center of the sheet.
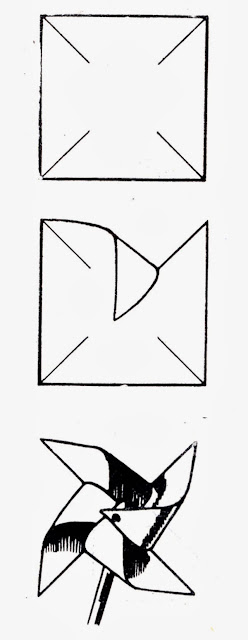 Before you make the pinwheel, it can be colored in different colors and also you can experiment with different kinds of materials as replacement for the paper.
You can place more than one pinwheels on one stick and use it as a scarecrow.

Read more »
How to Make a Pinwheel:
Attach the end of the needle to a wooden stick and the pinwheel is finished.You can place more than one pinwheels on one stick and use it as a scarecrow.
How to Make an Easel
A strong and substantial easel may be made at home with very little expense and no great difficulty.
Smooth down with a plane, four pieces of pine, 1 in. thick, 4 in. wide and 4 ft. long, until suitable for legs. Make three cross-pieces, Fig. 1, and join the legs with them as shown in Fig. 2. With an auger bore a hole in each leg about 3 in. from the bottom, and fit into each a little peg, Fig. 2, for the picture to rest on. The peg should be of hardwood so it will not break.
Cut the handle from an old broom, measure off the right length, and put a hinge on one end. Fasten this leg on the second cross-piece, thus forming a support for the two front legs, Fig. 3. The easel may be finished according to the individual taste. It may be sandpapered and stained and varnished, or painted in some pretty tint, or, if preferred, may be enameled.

Details of Easel Construction
—Contributed by G. J. Tress.
Excerpt from the book:
THE BOY MECHANIC
VOLUME I
700 THINGS FOR BOYS TO DO
WITH 800 ILLUSTRATIONS
1913, BY H. H. WINDSOR CHICAGO
POPULAR MECHANICS CO. PUBLISHERS
Read more »
Smooth down with a plane, four pieces of pine, 1 in. thick, 4 in. wide and 4 ft. long, until suitable for legs. Make three cross-pieces, Fig. 1, and join the legs with them as shown in Fig. 2. With an auger bore a hole in each leg about 3 in. from the bottom, and fit into each a little peg, Fig. 2, for the picture to rest on. The peg should be of hardwood so it will not break.
Cut the handle from an old broom, measure off the right length, and put a hinge on one end. Fasten this leg on the second cross-piece, thus forming a support for the two front legs, Fig. 3. The easel may be finished according to the individual taste. It may be sandpapered and stained and varnished, or painted in some pretty tint, or, if preferred, may be enameled.
Details of Easel Construction
—Contributed by G. J. Tress.
Excerpt from the book:
THE BOY MECHANIC
VOLUME I
700 THINGS FOR BOYS TO DO
WITH 800 ILLUSTRATIONS
1913, BY H. H. WINDSOR CHICAGO
POPULAR MECHANICS CO. PUBLISHERS
Subscribe to:
Posts (Atom)